往期回顧:
程序維護中的一個基本問題是——缺陷修復總會以(20-50)%的機率引入新的bug。所以整個過程是前進兩步,後退一步。 ——布魯克斯《人月神話》
1. 合約升級的必要性
智能合約本質上是程序,既然是程序,缺陷就不可避免。即便是經過大量測試和審計的智能合約,仍然可能會有漏洞。合約的漏洞如果被攻擊者利用,可能造成用戶資產的損失,導致嚴重的後果。漏洞的修復往往需要通過合約升級來實現。除了漏洞修復,新特性的加入也需要合約升級。因此合約的可升級性非常有必要。本期Rust智能合約養成日記,將為大家介紹Rust合約的升級方式。
2. Solidity合約常見升級方式
以太坊中,智能合約具有不可變性,一旦被部署到鏈上,沒有人可以改變它。
那麼如果合約存在漏洞或合約需要添加新功能,該如何修改合約的代碼?解決方案是將新的合約部署到區塊鏈上。
該方法面臨的挑戰是,solidity每次部署合約後,合約都會被分配一個唯一的地址。因此所有用到了該合約的DApps都需要修改合約地址來適配新的合約。此外,舊版本合約中的狀態需要遷移到新版本合約中,狀態較為複雜的合約遷移的工作量很大,容易出錯,而且複制數據的Gas費用高。
因此,我們通常採用數據和邏輯分離的架構,將數據保存在一個不處理任何邏輯的合約(狀態合約)中,所有的邏輯在另一個合約(邏輯合約)中實現。通常合約升級修改的是邏輯,使用該架構只需要升級邏輯合約,不需要擔心狀態遷移。
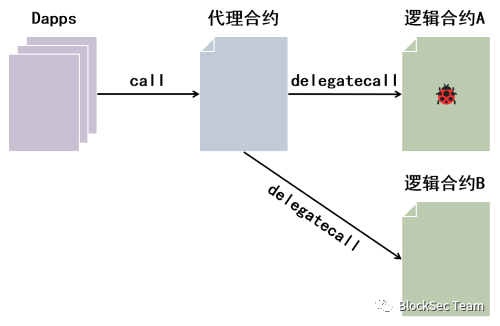
為了解決這個問題,可以使用代理合約(Proxy Contract),具體架構如下圖所示。

代理合約用來來存儲數據,並且使用delegatecall調用邏輯合約A,這樣合約A讀寫的數據都存儲在代理合約中。如果需要升級邏輯合約,部署新的合約B,然後發一條交易給代理合約,讓代理合約指向新的邏輯合約B即可。
3. NEAR 合約升級常用方法
接下來我們將以StatusMessage項目為例,給大家介紹NEAR 合約的常用升級方法,如下是StatusMessage的合約代碼
#[near_bindgen]#[derive(BorshDeserialize, BorshSerialize)]pub struct StatusMessage {records: LookupMap<String, String>,}impl Default for StatusMessage {fn default () -> Self {Self {records: LookupMap::new( b'r' .to_vec()),}}}#[near_bindgen]impl StatusMessage {pub fn set_status(&mut self , message: String) {let account_id = env::signer_account_id();self .records.insert(&account_id, &message);}pub fn get_status(& self , account_id: String) -> Option<String> {return self .records.get(&account_id);}}
我們先將編譯好的合約部署在測試網上。
near deploy \--accountId statusmessage.blocksec_upgrade.testnet \--wasmFile target/wasm32-unknown-unknown/release/status_message.wasm
transaction 如下
https: //explorer.testnet.near.org/transactions/BgMFFY8Bo2e2bETiEvpfTgJcZwS5oC1Nv4aKwrFQCqgd接著我們調用set_status 方法,向合約中存儲數據
near call --accountId blocksec_upgrade.testnet statusmessage.blocksec_upgrade.testnet set_status '{'message':'Hi!BlockSec'}'transaction 如下
https: //explorer.testnet.near.org/transactions/8QAH66QczyMSEizbfvygj8FVhxThQZUvJ6DY9hsZVyh9接下來我們詳細討論兩種不同的合約升級情況
3.1 合約數據結構未被修改
例如我們增加一個函數:
#[near_bindgen]impl StatusMessage {pub fn set_get_status(&mut self , message: String) -> Option<String> {let account_id = env::signer_account_id();self .records.insert(&account_id, &message);return self .records.get(&account_id);}}
編譯後使用deploy重新部署:
$ near deploy \--accountId statusmessage.blocksec_upgrade.testnet \--wasmFile target/wasm32-unknown-unknown/release/status_message.wasm
會提示該賬戶已經部署了一個合約,是否繼續。輸入y確認即可。
This account already has a deployed contract [ EVuouKAEq4JWsj3i96qhEf6QK3AMR1K3a1wy9g8qmM3J ]. Do you want to proceed? (y/n) yStarting deployment. Account id : statusmessage.blocksec_upgrade.testnet, node: https://rpc.testnet.near.org, helper: https://helper.testnet.near.org, file : target/wasm32- unknown - unknown / release /status_message.wasmTransaction Id 7 aeqQV9PWRzPhyaGSizTP6HtPSfqJzoczwg15NzDodSVTo see the transaction in the transaction explorer, please open this url in your browserhttps://explorer.testnet.near.org/transactions/ 7 aeqQV9PWRzPhyaGSizTP6HtPSfqJzoczwg15NzDodSVDone deploying to statusmessage.blocksec_upgrade.testnet
接著我們調用get_status方法讀取之前寫入的數據
near call --accountId blocksec_upgrade.testnet statusmessage.blocksec_upgrade.testnet get_status '{ 'account_id' : 'blocksec_upgrade.testnet' }'原來合約中的數據能成功讀取:
Scheduling a call : statusmessage.blocksec_upgrade.testnet.get_status({ 'account_id' : 'blocksec_upgrade.testnet' })Doing account.functionCall()Transaction Id FwGWCVuAo6dgvPfCJyS9HZAMstiZx4b47vb7kAx3GGMETo see the transaction in the transaction explorer, please open this url in your browserhttps://explorer.testnet.near.org/transactions/FwGWCVuAo6dgvPfCJyS9HZAMstiZx4b47vb7kAx3GGME'Hi!BlockSec'
這是因為NEAR合約可以重複部署,如果一個賬戶(地址)已經部署過合約,再次調用near deploy命令可以將新的合約代碼部署到該賬戶上。如果我們只修改合約邏輯,不涉及數據結構的修改,可以直接使用near deploy部署新的代碼。
3.2合約數據結構被修改
我們將該合約升級,修改了原來的數據結構,去除了records, 新增了taglines和bios
#[near_bindgen]#[derive(BorshDeserialize, BorshSerialize)]pub struct StatusMessage {taglines: LookupMap<String, String>,bios: LookupMap<String, String>,}impl Default for StatusMessage {fn default () -> Self {Self {taglines: LookupMap::new( b'r' .to_vec()),bios: LookupMap::new( b'b' .to_vec()),}}}#[near_bindgen]impl StatusMessage {pub fn set_tagline(&mut self , message: String) {let account_id = env::signer_account_id();self .taglines.insert(&account_id, &message);}pub fn get_tagline(& self , account_id: String) -> Option<String> {return self .taglines.get(&account_id);}pub fn set_bio(&mut self , message: String) {let account_id = env::signer_account_id();self .bios.insert(&account_id, &message);}pub fn get_bio(& self , account_id: String) -> Option<String> {return self .bios.get(&account_id);}}
我們嘗試再次重新部署:
near deploy --accountId statusmessage.blocksec_upgrade.testnet --wasmFile target/wasm32-unknown-unknown/release/status_message.wasm合約還是成功部署了
This account already has a deployed contract [ EzVBv3yrji88y4Lz1o3JZ8LymcDJHywFzjwkL2Cm5aHb ]. Do you want to proceed? (y/n) yStarting deployment. Account id : statusmessage.blocksec_upgrade.testnet, node: https://rpc.testnet.near.org, helper: https://helper.testnet.near.org, file : target/wasm32- unknown - unknown / release /status_message.wasmTransaction Id HYbXxTE1Y6h1hJhhHgekfw9rx7FT77CCW7NDRuKWzqYzTo see the transaction in the transaction explorer, please open this url in your browserhttps://explorer.testnet.near.org/transactions/HYbXxTE1Y6h1hJhhHgekfw9rx7FT77CCW7NDRuKWzqYzDonedeploying to statusmessage.blocksec_upgrade.testnet
但是我們調用get_tagline方法讀取存儲的數據:
near call --accountId blocksec_upgrade.testnet statusmessage.blocksec_upgrade.testnet get_tagline '{'account_id':'blocksec_upgrade.testnet'}'會發現出錯了,錯誤提示如下
Cannot deserialize the contract state.具體的transaction見
https: //explorer.testnet.near.org/transactions/4hQQ1zAwU5bsbfb6tA6DQDqjmFcHsBwaBctdHaPiCKHu這是因為合約的狀態是以序列化數據的形式進行持久化存儲的,重新部署合約後,代碼中的數據結構變了,狀態沒有變,新的數據結構匹配不上舊狀態,就出錯了。
3.3Migrate升級智能合約
NEAR提供了Migrate方法去幫助我們對合約進行升級,針對3.2中所出現的錯誤,我們在新的合約中加入migrate方法:
#[private]#[init(ignore_state)]pub fn migrate() -> Self {let old_state: OldStatusMessage = env::state_read().expect( 'failed' );Self {taglines: old_state.records,bios: LookupMap::new( b'b' .to_vec()),}}
代碼中的#[init(ignore_state)]表示在migrate函數執行前不要加載狀態。接著,我們重新部署合約,但是在部署的同時調用migrate方法
near deploy \--wasmFile target/wasm32-unknown-unknown/release/status_message.wasm \--initFunction 'migrate' \--initArgs '{}' \--accountId statusmessage.blocksec_upgrade.testnet
如下所示,該合約被成功部署
This account already has a deployed contract [ D7AkSRdmktVAXSFDE7RGT3QSjS531wQsLR8MhY5YiLbM ]. Do you want to proceed? (y/n) yStarting deployment. Account id : statusmessage.blocksec_upgrade.testnet, node: https://rpc.testnet.near.org, helper: https://helper.testnet.near.org, file : target/wasm32- unknown - unknown / release /status_message.wasmTransaction Id DsoJbii6ofCTGdtgyirvqudUQNFgzaasJExXpWMFMG5mTo see the transaction in the transaction explorer, please open this url in your browserhttps://explorer.testnet.near.org/transactions/DsoJbii6ofCTGdtgyirvqudUQNFgzaasJExXpWMFMG5mDone deploying and initializing statusmessage.blocksec_upgrade.testnet
我們嘗試調用合約新增的方法get_tagline去獲取新增的數據taglines
near call --accountId blocksec_upgrade.testnet statusmessage.blocksec_upgrade.testnet get_tagline '{'account_id':'blocksec_upgrade.testnet'}'可以看到方法被成功調用,舊的合約數據也被遷移到新的合約
Scheduling a call : statusmessage.blocksec_upgrade.testnet.get_tagline({ 'account_id' : 'blocksec_upgrade.testnet' })Doing account.functionCall()Transaction Id 9 xymz7sL5GhsbWJHBY8KWDXYqSj8eQ2sQy631juQsws7To see the transaction in the transaction explorer, please open this url in your browserhttps://explorer.testnet.near.org/transactions/ 9 xymz7sL5GhsbWJHBY8KWDXYqSj8eQ2sQy631juQsws7'Hi!BlockSec'
4. 合約升級的安全考量
合約安全升級首先要考慮權限控制,一般合約只能由開發者或DAO升級。上一期Rust 智能合約養成日記(8)合約安全之權限控制介紹了特權函數的訪問控制,一般合約的升級函數為only owner函數,確保只能由owner調用。
我們推薦盡可能將合約的owner設置為DAO,通過提案和投票來共同管理合約。因為owner設置為個人賬戶,合約高度中心化,owner可以隨意修改合約數據,還存在owner私鑰丟失的風險。
除此之外,開發者在做合約遷移時,還可以考慮以下幾點建議
在遷移函數前加入
#[init(ignore_state)],確保執行遷移函數前不加載狀態。遷移完成後儘量刪除遷移函數,確保遷移函數只被調用一次。
新增的數據結構在遷移時完成初始化。


